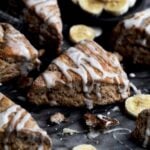
Gluten Free Banana Scones
These Gluten Free Banana Scones have a mild banana flavor with a light sweetness thanks to a delicious maple glaze. They only need 2 bananas, zero mixer and take less than an hour to make! Best part is, they’re gluten free, nut free, egg free and can easily be vegan!
Servings: 8 Scones
Calories: 359kcal
Ingredients
For the Banana Scones
- 2 cups multipurpose gluten free flour (I use a gluten free multipurpose flour with xanthan gum already in it)
- 2 teaspoons baking powder
- ¼ teaspoon baking soda
- ½ teaspoon kosher salt
- ¼ cup light brown sugar , packed
- 1.5 teaspoons ground cinnamon
- ½ cup unsalted butter or vegan baking stick, frozen
- ½ cup milk
- ½ tablespoon white vinegar
- 2 medium bananas , mashed
For the Maple Glaze
- 1.5 cups confectioners’ sugar
- 1 tablespoon pure maple syrup (I use grade A)
- ½ tablespoon water , room temperature
Instructions
- Preheat the oven to 375 degrees Fahrenheit and line a baking sheet with parchment paper.
- In a large bowl, whisk together the 2 cups multipurpose gluten free flour, 2 teaspoons baking powder, ¼ teaspoon baking soda, ½ teaspoon kosher salt, ¼ cup light brown sugar and 1 ½ teaspoons ground cinnamon. Set aside.
- Take the ½ cup butter out of the freezer (if you didn’t freeze the butter that’s ok but the scones won’t be as flaky).Using a cheese grater, grate the entire stick of butter into the flour mixture.
- Mix the grated butter into the flour using clean hands. I kind of rub the flour together in my hands like sand to make sure there are no giant clumps of butter. The pieces of butter should be super tiny. Less than the size of a pea.
- Measure out ½ cup of milk. Add in the ½ tablespoon of white vinegar and stir to combine. Let sit 5 minutes and stir again. It will be chunky; that's normal.
- In a small bowl, mash the 2 bananas with a fork. You want them to end up fairly liquidy.
- Pour your buttermilk in a circular motion into the flour mixture and put in the bananas. Mix everything together with the spatula. It should start to form a dough. If the dough is too sticky to work with, add more flour, one tablespoon at a time.
- Take your dough out of the bowl and onto a clean floured work surface. Form the dough into a flat disc that is about 8 inches in diameter.
- Carefully put a little gluten free flour on a sharp knife and cut the dough like a pizza into 8 equal slices.
- Place the slices on the lined baking sheet at least 2-3 inches apart from one another.
- Bake for 19-22 min or until the tops just start to get golden.
- Take the sheet out and let the scones cool on a cooling rack.
- Place wax or parchment paper underneath your cooling rack. (The parchment paper under the rack is just to prevent a giant mess on your counter because the glaze can drip as it hardens).
- While they’re cooling, make the glaze. In a medium bowl, whisk together the ½ cup confectioners’ sugar, 1 tablespoon maple syrup and ½ tablespoon of water until combined and smooth.
- Drizzle the maple glaze on top of the cool scones. If you drizzle it on warm banana scones, the glaze will melt.It is easier to hold your hand about 6 inches above the scones and move your arm side to side while drizzling to create a horizontal pattern. Then get more glaze and move your arm from top to bottom to create a vertical pattern.Let the glaze harden prior to eating or it will have a strong confectioners' super flavor.
- Cut the scones open and serve them with butter or vegan baking sticks or just eat them as they are! They are best consumed the first day. Enjoy!
Video
Notes
Vegan: Use a dairy free gluten free flour, vegan sugar, vegan baking sticks, a non-dairy milk and vegan maple syrup.
All Purpose Flour: I cannot test this due to celiac disease, but use 2 packed cups of regular flour (336 grams) and 2 tablespoons of milk. Still chill the dough.
Storing: Once the glaze has hardened, store the scones in an airtight container or zip top bag at room temperature for up to 3 days.
Freezing: Place scones (not stacked) on a parchment lined baking sheet and pop in the freezer uncovered. Freeze for 10-15 minutes or until the scones are completely frozen. Once frozen, you can store them stacked in a freezer safe airtight container or zip top bag in the freezer for up to 1 month. To defrost, take the container out and leave at room temperature until soft. 1-2 hours.
If it is super humid outside, do not put the glaze on the scones until they are defrosted, the day you plan on serving them. When it is humid, the glaze tends to be very wet when defrosting.
Nutrition: The info below is a generated estimate and is not guaranteed to be accurate.
Nutrition
Calories: 359kcal | Carbohydrates: 61g | Protein: 4g | Fat: 13g | Saturated Fat: 8g | Polyunsaturated Fat: 1g | Monounsaturated Fat: 3g | Trans Fat: 0.5g | Cholesterol: 32mg | Sodium: 296mg | Potassium: 149mg | Fiber: 4g | Sugar: 36g | Vitamin A: 399IU | Vitamin C: 3mg | Calcium: 115mg | Iron: 1mg