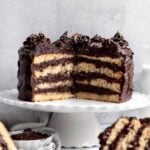
Yellow Cake with Chocolate Frosting
This Yellow Cake with Chocolate Frosting is a delicious soft and fluffy golden cake surrounded by layers of fudgy chocolate frosting. Perfect for any occasion, not just birthdays, it is simple to make and easy to assemble! Best of all, it’s gluten free, nut free, egg free and easily vegan!
Servings: 12 Slices
Calories: 787kcal
Ingredients
For the Yellow Cake
- 2 ¼ cups multipurpose gluten free flour (I use a gluten free multipurpose flour with xanthan gum already in it)
- 1 cup granulated sugar
- 1 ½ teaspoons baking powder
- ½ teaspoon baking soda
- ½ teaspoon kosher salt
- 1 ½ cups milk
- ½ cup light brown sugar , packed
- ½ cup vegetable oil
- 2 teaspoons pure vanilla extract
For the Chocolate Fudge Frosting
- 1.5 cups unsalted butter or vegan being stick, room temperature
- 7 cups confectioners' sugar
- 2 cups cocoa power ( I use 1 cup of Dutch or Natural Unsweetened and 1 cup of Dark)
- 4 teaspoons pure vanilla extract
- 1 cup water , room temperature
Instructions
For the Yellow Cake
- Preheat the oven to 350 degrees Fahrenheit and grease and line two 8 inch cake pans with parchment paper. Set aside.
- In a large bowl whisk together the 2 ¼ cups multipurpose gluten free flour, 1 cup granulated sugar, 1 ½ teaspoons baking powder, ½ teaspoon baking soda and ½ teaspoon kosher salt. Set aside.
- In a medium bowl, whisk together the 1 ½ cups milk, ½ cup light brown sugar, ½ cup vegetable oil and 2 teaspoons pure vanilla extract.
- Slowly add the milk mixture into the dry ingredients and whisk to combine. It if gets too thick, switch to a spatula but it should be fairly liquidy.
- Divide the batter evenly into 2 greased and parchment lined 8 inch cake pans and smooth the tops with a butter knife.
- Bake the cakes in the center rack at 350 degrees Fahrenheit for 35 minutes until slightly springy when carefully touched.
- Remove cakes from oven and let the cakes cool almost completely in the pan for 15 mins before trying to remove. Then remove from pans and let cool completely on a wire cooling rack.Once cool, slice both cakes in half horizontally. Now you have 4 thin layers of cake.If your cakes have dome tops, you can take a thin layer off the tops of the cake with a knife, to make a flat surface.
For the Chocolate Fudge Frosting
- In the large bowl of an electric mixer or using a hand held mixer, beat the 1 ½ cups unsalted butter until smooth.
- Slowly beat in the 7 cups plus confectioners' sugar, the 2 cups cocoa powder and the 4 teaspoons pure vanilla extract and beat until combined.
- Slowly beat in the 1 cup of water a little at a time until you get the desired consistency. You may not need to use it all.
Assemble the Cake and Decorate
- Separate the frosting into 5 equal sections.Place one layer of cake on the bottom of a cake plate/stand. Scoop ⅕ (about 1 cup) of the frosting on top and use an icing spatula to spread it around.
- Place another layer of cake on top; repeat this same process. Do this with 3 layers of cake.
- Once you get to the last layer of cake, place it bottom (or flat) side up so the top of the cake is nice and flat. Use an icing spatula or a butter knife to frost the top and a thin layer on the sides of the cakeYou should only use a fifth of the frosting on the top and sides combined.
- Take the last ⅕th of buttercream and put it into a piping bag. Create swirls going all the way around the top rim of the cake.Sprinkle some nonpareils or sprinkles on top of the frosting swirls. Enjoy!
Video
Notes
Vegan: Use a dairy free gluten free flour, vegan sugar, vegan baking sticks, non-dairy milk and vegan sprinkles.
All Purpose Flour: I cannot test this due to celiac disease, but use 2 ¼ cups packed AP flour (378 grams) and only 1 ¼ cups of milk.
Storing: Once the cake is cut into, it’s best to cut the entire cake into slices and wrap each slice in foil and store in a zip top bag in the fridge. Eat extra slices within 2 days.
When ready to eat, let the slices sit on the counter, in the foil for about an hour or until the cake is room temperature and soft. If you want to microwave a slice, do it in 5 second increments and be careful not to burn your mouth on hot frosting.
Freezing: If not eating all the extra slices within 2 days, take the slices wrapped in foil and place in the zip top bag and freeze them. You can keep the slices frozen for up to 30 days.
When ready to eat, put the slices in the fridge the night before or leave them out on the counter for 2 hours prior to eating or until the cake is room temperature and soft.
Nutrition: The info below is a generated estimate and is not guaranteed to be accurate.
Nutrition
Calories: 787kcal | Carbohydrates: 122g | Protein: 6g | Fat: 36g | Saturated Fat: 18g | Polyunsaturated Fat: 6g | Monounsaturated Fat: 9g | Trans Fat: 1g | Cholesterol: 65mg | Sodium: 219mg | Potassium: 287mg | Fiber: 8g | Sugar: 97g | Vitamin A: 759IU | Calcium: 116mg | Iron: 3mg