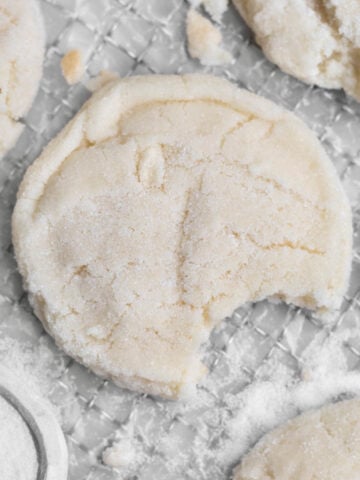
These gluten free Sugar Cookies with Frosting are chewy in the middles, crispy on the edges and topped with a creamy vanilla buttercream! To make these delicious treats you just need a whisk and a spatula; no mixer is used at all! If that wasn't enough, these gluten free sugar cookies are also eggless sugar cookies, nut free, and can easily be dairy free (vegan)!

I'm obsessed with Sugar Cookies with Frosting and these beauties are no exception! They're similar to those classic lofthouse sugar cookies but egg and gluten free! Best part is, you would never ever know that they are! They're soft, chewy and so simple to make. No mixer is needed at all so clean up is a breeze! I have over 20 different gluten free sugar cookies on the blog and I have to say these may just be my absolute favorites!
For more gluten free sugar cookies, try my super popular Sprinkle Sugar Cookies, my Strawberry Sugar Cookies, my Dark Chocolate Sugar Cookies or my Cut Out Sugar Cookies!
Reasons to Love These Sugar Cookies with Frosting
- Allergy Friendly- These cookies are gluten free, nut free, egg free and can easily be dairy free (vegan)!
- Chewy Sugar Cookies- Even though they're crispy they still have nice chewy centers so the cookies aren't dry!
- Crispy Edges- They have crispy edges and a crisp exterior thanks to being pressed in extra sugar prior to baking.
- Easy to Make- You don't need a mixer of any kind to make the cookie dough and they only require 45 minutes of chill time prior to baking.
Ingredient Notes

- Gluten Free Flour- If you also have nut allergies, make sure to use a brand that’s made in a nut free facility. I really love to use this gluten free flour because it’s free of the top 9 allergens. It also contains xanthan gum which really helps give baked goods their bounce and prevents them from falling apart.
- Milk- If there are no dairy allergies or if you’re not vegan, you can use regular whole milk. For non-dairy, use a dairy-free milk of your choosing.
- Butter/ Vegan Baking Stick- For this recipe we are actually using melted butter. Make sure to cool it so it's creamy in texture. For the frosting, only use room temperature butter. If using vegan butter in the frosting, make sure it's on the cold side versus room temperature. Also, use vegan baking sticks instead of vegan butter from a tub.
- Cornstarch and Water- This is an egg free sugar cookies recipe so this mixture is needed to help bind everything together.
- Granulated Sugar- It wouldn't be a sugar cookie without this main ingredient!
- Vanilla- Make sure to only use pure vanilla extract otherwise the cookies can have a chemical flavor.
- Water- This frosting uses room temperature water instead of milk! Add it in slowly; you may not need it all.
See my recipe card below for a complete list of the ingredients with measurements.
Substitutions and Variations
How to Make these into Vegan Sugar Cookies
- Use a gluten free flour that’s free from dairy.
- Make sure the brand of sugar you use is vegan.
- Use vegan baking sticks instead of butter.
- Only use a non-dairy milk of choice.
Make this Recipe with All Purpose Flour
- Use 1 ¾ cups packed AP flour (294 grams).
- Use 2 tablespoons milk.
- You still need to chill the dough due to the lack of eggs.
For Corn Allergies
- Swap out the cornstarch and instead use equal amounts of arrowroot starch or tapioca starch.
Make Smaller Crunchy Sugar Cookies
- Use a small cookie scoop or roll the dough into 1 inch balls and flatten into discs. Coat the tops and sides with the extra granulated sugar.
- Bake the cookies at the same temperature but for 12 minutes. Reshape as needed. Should make 24 cookies.
For Natural Pink Frosting
- Replace the red food coloring with plant based.
- Or for a natural pink frosting with zero food coloring, please use my Strawberry Buttercream, my Raspberry Buttercream, Blueberry Frosting, or you can use the Blackberry Frosting recipe from my Blackberry Cookies.
This recipe has not been tested with all of these substitutions and/or variations due to celiac disease and food allergies. If you change any of the ingredients, please let us know how the recipe turned out in the comments below!

How to Sugar Cookies with Frosting
Here are the step by step instructions for how to make these gluten free sugar cookies from scratch!

Step 1: Melt the Butter
Microwave the butter in 11 second increments until almost fully melted. Whisk until fully melted; the residual heat will melt the rest. Set aside to cool. Do not microwave until it bubbles or browns.

Step 2: Whisk Together the Dry Ingredients
In a medium bowl, whisk together the gluten free flour, baking powder and kosher salt. Set aside.

Step 3: Make the Cornstarch Water
In a small bowl, using a spoon, mix together the cornstarch and water until thin and watery. It will be thick and tacky at first.

Step 4: Mix in the Sugar, Cornstarch Water and Vanilla
Into the cooled and creamy melted butter, whisk in the granulated sugar, the cornstarch water and the pure vanilla extract until fully combined.

Step 5: Add in the Flour Mixture and Milk
Starting and ending with the flour mixture, whisk half the flour into the melted butter mixture. Add the milk and whisk until combined.
Using a spatula, gently fold in the rest of the flour until combined. Do not over mix or the dough will become shiny and too sticky.

Step 6: Chill and Form into Balls
The dough will be very sticky. Add it to a freezer safe bowl, cover the top with plastic wrap and freeze for 45 min.
After 45 min, using a large cookie scoop, make 12 scoops with the dough.
If the dough is sticking to the cookie scoop, wash the scoop half way through to get off any stuck on dough.

Step 7: Flatten into Discs and Coat with Sugar
Flatten each scoop into a thick disc versus a ball. Coat the top and sides with granulated sugar. Do not coat the bottom with sugar or the cookies will burn.
You must flatten or the cookies will remain in the ball shape when baked.

Step 8: Bake the Cookies and Cool
Place the discs about 3-4 inches apart on the parchment lined baking sheet. Bake the cookies at 325 degrees Fahrenheit for 15 minutes.
Immediately reshape the cookies when they come out of the oven and let cool on the baking sheet for 5 min before transferring to a cooling rack.

Step 9: Make the Frosting
Mix together the butter, confectioners' sugar, pure vanilla extract and kosher salt until combined.
Slowly add in the water a little at a time until you get the desired consistency. You may not need all the water.

Step 10: Frost the Cookies
Using an icing spatula or a butter knife, frost the tops of the completely cooled cookies. Don't go all the way to the edge of the cookie. Make sure you can see the cookie on the edges.
Immediately top with sprinkles (while the frosting is still wet) if desired.
Expert Baking Tips
For the Sugar Cookies
- Use Packed Cups of Flour- Normally in baking we do not use packed cups however, when working with gluten free, I've found using packed cups works best to help the baked goods keep their shape. For this recipe make sure to use packed cups or please read the gram amount.
- Use Cooled Melted Butter- The butter cannot be bubbling/browned or the cookies will be very thin, spread out and oily. Microwave until there is a little bit of butter left unmelted; whisk it until the residual heat melts the rest of the butter. Then set aside to cool as you prep the rest of the recipe. When it is time to use the butter it should be cool and thick/creamy. Whisk it again to make it smooth. You can see in my video.
- Add the Flour then Milk then More Flour- Do not add the milk with the wet ingredients. The batter will be too wet and shiny and the cookies will be very buttery and flakey. You must add half the flour, then the milk and then the rest of the flour.
- Freezing the Dough- If you don’t freeze the cookie dough for at least 45 minutes, the dough will be too sticky to form into scoops and discs.
- Wash the Cookie Scoop- If you notice the dough getting stuck in the cookie scoop, wash and dry your scoop halfway through making the dough balls.
- Flatten Dough Balls into Thick Discs- This step is important. If you don't do this, the cookies will remain in a ball shape while baking.
- Wet Your Hands- The cookie dough will be quite sticky and may stick to your hands if they're warm. If this happens, rinse your hands and then shake off any excess water. You want them slightly wet but not dripping wet. This will help prevent the dough from sticking. If the dough discs need some reshaping, simply use your slightly wet hands to make the dough discs tops smooth.
- Reshape the Cookies- If you want your cookies nice and round, reshape them as soon as they come out of the oven. Use a spatula to push them back into a circle shape. Work quickly because they harden pretty fast.
For the Vanilla Buttercream Frosting
- Use Room Temperature Butter- Do not use softened or melted butter/vegan baking sticks. The frosting will be way too runny.
- Making The Frosting- If the frosting is too liquidy, add more confectioners’ sugar 1 tablespoon at a time until you reach the desired consistency. It should be thick enough to stay put on the cookies and not run off. If the buttercream appears too thick, add a little water ¼ teaspoon at a time.
Recipe FAQs
Yes. You can make the cookie dough the day before. Keep it in a bowl and cover the top with plastic wrap. Store it in the fridge.
If doing this, there is no need to freeze the dough prior to baking.
Freezing Raw Dough: Form the dough into the discs but do not dip in extra sugar. Place dough discs (not stacked) on a parchment lined baking sheet and pop in the freezer uncovered. Freeze for 10-15 minutes or until hard. Once frozen, store the dough discs in a zip top bag for 1 month. When ready to use, let sit on the counter for about 5-10 min until you can dip the tops in granulated sugar. Bake at the same temperature for 17 minutes instead of 15.
Most gluten free baked goods are best made the same day, but you can make these cookies a day before!
Store the cookies in a single layer in an airtight container in the fridge. Do not stack.
Yes! You can make the vanilla frosting the night before. Store it in a bowl covered with plastic wrap in the fridge.
When ready to use, bring the frosting to room temperature and mix with a spatula or electric mixer to regain its creaminess.
Storing: Store the frosted cookies in a single layer, in an airtight container in the fridge for up to 3 days. Do not stack. Do not leave the cookies at room temperature.
They're still soft when in the fridge but you can let them come to room temperature before eating if desired.
Freezing Baked Cookies: To freeze already baked cookies, place cookies (not stacked) on a parchment lined baking sheet and pop in the freezer uncovered. Freeze for 10-15 minutes or until the cookies are completely frozen. Once frozen, you can store them stacked in a freezer safe airtight container or zip top bag in the freezer for up to 1 month. To defrost, take the container out and leave at room temperature until soft. 1-2 hours.
Freezing Raw Dough: Form the dough into the discs but do not dip in extra sugar. Place dough discs (not stacked) on a parchment lined baking sheet and pop in the freezer uncovered. Freeze for 10-15 minutes or until hard. Once frozen, store the dough discs in a zip top bag for 1 month. When ready to use, let sit on the counter for about 5-10 min until you can dip the tops in granulated sugar. Bake at the same temperature for 17 minutes instead of 15.

Other Gluten Free Sugar Cookies You'll Love
Did you try this recipe? Please leave me a ⭐ review below!
Don’t forget to tag me on Instagram @laneandgreyfare and follow along on Pinterest, Facebook and YouTube! Enjoy!!!
📖 Recipe

Sugar Cookies with Frosting
Ingredients
For the Sugar Cookies
- 1 ¾ cups multipurpose gluten free flour (I use a gluten free multipurpose flour with xanthan gum already in it)
- 1 ½ teaspoons baking powder
- ½ teaspoon kosher salt
- 2 rounded tablespoons cornstarch mixed with 3 tablespoons water
- ½ cup unsalted butter or vegan baking stick, melted and cooled
- ¼ cup plus 2 tablespoons granulated sugar (reserve 2 tablespoons for rolling)
- 1 ½ teaspoons pure vanilla extract
- ¼ cup milk
For the Vanilla Buttercream
- ¼ cup unsalted butter or vegan baking stick, room temperature
- 2 ¼ cups confectioners' sugar
- 1 teaspoon pure vanilla extract
- 2 tablespoons water , room temperature
- 1 drop red food coloring (if desired)
For the Topping
- ¼ cup sprinkles , if desired
Instructions
- Place the ½ cup unsalted butter or vegan baking stick in a heat safe bowl. Place a paper towel on top of the bowl so the butter doesn't splatter.Microwave in 11 second increments until almost melted. Whisk until fully melted; the residual heat will melt the rest. Set aside to cool. Do not microwave until it bubbles or browns.
- In a medium bowl, whisk together the 1 ¾ cups multipurpose gluten free flour, 1 ½ teaspoons baking powder and ½ teaspoon kosher salt. Set aside.
- In a small bowl, using a spoon, mix together the 2 rounded tablespoons of cornstarch and the 3 tablespoons of water until thin and watery. It will be thick and tacky at first.
- Whisk the cooled butter until a creamy liquid. It may be thick from sitting out.Into the cooled and creamy melted butter, whisk in the 1 ¼ cups granulated sugar, the cornstarch water and the 1 ½ teaspoons pure vanilla extract until fully emulsified.
- Starting and ending with the flour mixture, whisk half the flour mixture into the melted butter mixture. Then add the ¼ cup milk and whisk to combine.Add in the second half of the flour mixture gently with a spatula. Do not over mix or the dough will become shiny and too sticky.
- The dough will be very sticky. Add it to a freezer safe bowl, cover the top with plastic wrap and pop the entire bowl of dough in the freezer for 45 min. When the dough is almost done chilling, preheat your oven to 325 degrees Fahrenheit and line a baking sheet with parchment paper. Do not grease.
- After 45 min, using a large cookie scoop, make 12 scoops with the dough. (I use a 2 ounce cookie scoop).If the dough is sticking to the cookie scoop, wash the scoop half way through to get off any stuck on dough.
- Flatten each scoop into a thick disc versus a ball. If you don't do this step, the cookies will remain in the ball shape when baking.Drop the top of the disc in the extra 2 tablespoons of granulated sugar and coat. Roll the disc on its side to coat the sides with sugar as well. Do not coat the bottom with sugar or the cookies will burn.
- Place the discs about 3-4 inches apart on the parchment lined baking sheet. Bake the cookies at 325 degrees Fahrenheit for 15 minutes.I only bake 6 at a time. Pop the rest of the dough discs in the fridge while the first batch is baking.
- Immediately reshape the cookies when they come out of the oven. Use a spatula to push them into a circle and let cool on the baking sheet for 5 min before transferring to a cooling rack. If you don't let them cool on the pan, the cookies will break apart into a giant mess when you try to lift them up.If any cookies have puffed up, gently push them down with the back of a cookie spatula.If you don't let them cool on the pan, the cookies will break apart into a giant mess when you try to lift them up.Let the cookies cool completely before adding the buttercream, otherwise the frosting will turn into a liquid mess.Repeat this with the remaining dough discs.
For the Vanilla Buttercream
- In a bowl, using a spatula, or in the bowl of an electric mixer, mix together the ¼ cup of butter, 2 ¼ cups of confectioners' sugar and 1 teaspoon pure vanilla extract.
- Slowly add in the 2 tablespoons of water a little at a time until you get the desired consistency. The frosting should be smooth and creamy. You may not need all the water.If adding the red food coloring, add a drop now and mix until the frosting is a light pink.
- Using an icing spatula or a butter knife, frost the tops of the completely cooled cookies. Don't go all the way to the edge of the cookie. Make sure you can see the cookie on the edges.
- If topping the cookies with sprinkles, add while the frosting is still wet, so the sprinkles stick.
Tom says
What a great cookie!
John says
These cookies came out great! Thank you!